Related articles


Setting up Webpacker for Rails 6 with Bootstrap, jQuery, and hot reloading

Since Rails (6) came with Webpacker, Webpacker is tending to become the new standard for precompiling resources. RIP Sprockets.
Like me, you may not be an expert in ES6 and so you are hesitant to get started. Like me, you may also have tried to create a new project and continue using Sprockets:
$ rails new MissyousProkets --skip-javascript --no-skip-sprockets
Result: Rails forces you into a new world: your asset compilation is not fully configured to use Webpacker or Sprockets. This article is not meant to help you keep the old ways, so I won't go on for too long on this topic.
This article will show you step-by-step how to completely set up Bootstrap 4, jQuery, and bonus: hot reloading modules ❤.
Note: As usual, you will find the source code hither with a branch for each section of this article.
Construction of the foundations of the project
At the time of writing this article, I used the latest version of Rails (6.0.3.1) and Ruby 2.6.7. When creating the project, I simply removed Turbolinks because I am not familiar with them (it's up to you).
$ rails -v
=> Rails 6.0.3.1
# Just to be sure that the Rails version is 6.0.3.1$ rails new webpackHowTo --skip-turbolinks
Now, we're also going to add a controller and an action so we can test what we're going to do.
$ cd webpackHOWTO
$ rails g controller Welcomes index
=>... [OK]
Provide the plugins: jQuery and Popper.js
If we take a look at the official Bootstrap 4 page, we can see that the latest version is 4.5.0 and that it requires jQuery and Popper.js. Let's add them via Yarn:
$ yarn add jquery popper.js
=> yarn add v1.22.4
=> [1/4] 🔍 Packet resolution...
=> [2/4] 🚚 Retrieving packages...
=> [3/4] 🔗 Linking dependencies...
=> [4/4] 🔨 Building new packages...
=> success Save the lock file.
=> success Save 3 new dependencies.
=> info Direct dependencies
=> edu. bootstrap @4 .5.0 ↩ bootstrap @4 .5.0
=> edu. jquery @3 .5.1
=> viz.- popper.js @1 .16.0
=> info All dependencies
=> edu. bootstrap @4 .5.0
=> edu. jquery @3 .5.1
=> viz.- popper.js @1 .16.0
=> ✨ Done in 3.64s.
jQuery and Popper.js will be used throughout the application so we can call them a plugin. We don't want to import them into each different pack so there's a special method for that with Webpacker: ProvidePlugin. This can be done in config/webpack/environment.js as it will be relevant regardless of the current environment:
# in config/webpack/environment.jsconst {environment} = require ('@rails /webpacker'); const webpack = require ('webpack'); environment.plugins.append ('Provide', new webpack.providePlugin ({
$: 'jquery',
jQuery: 'jquery',
Popper: ['popper.js', 'default']
})); const config = environment.toWebpackConfig (); config.resolve.alias = {
jquery: 'jquery/src/jquery'; config.resolve.alias = {jquery: 'jquery/src/jquery'}.
}; module.exports = environment;
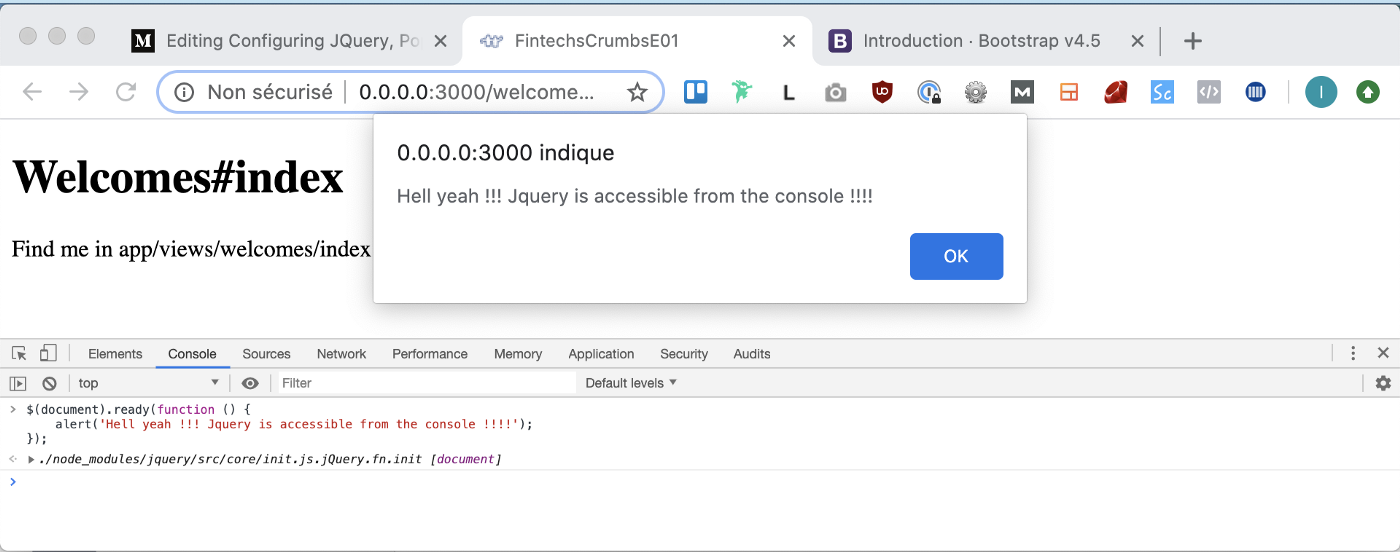
Note that the previous configuration also makes the plugins available globally. In other words: jQuery is now accessible from the console (🙌🏽):
Organize your assets
Now it's time to organize our app/javascript folder to keep the various assets separate.
Note that the frontend for this project is not a javascript application like Vue, Angular, or ReactJS. The following organization is suitable for a regular project with Sass, jQuery, and Images. Here's how I like to organize my files:
app/javascript/
- channels/
//[default]
- images/
//All your images here
- js/
- site.js//equivalent to the old "application.js”.
- packs/
- application.js//Your first “pack”.
- scss/
- site.scss//equivalent to the old “application.scss” folder.
Of course, inside the images, js, and scss folders, you need to organize your files properly to keep the system scalable.
Now let's set up our first pack.
# in app/javascript/packs/application.js
require (” @rails /ujs “) .start ()
require (” @rails /activestorage “) .start ()
require (“channels”)//CSS
import 'scss/site'// JS
import ('js/site')//Images
const images = require.context ('.. /images', true)
const imagePath = (name) => images (name, true)
We made 3 main changes to the file:
Importing the “scss/site.scss” file.
- It will be the equivalent of your application.scss file.
Importing the "js/site.js" file.
- It will be the equivalent of your Application.js file. Uncomment the code needed for the image_pack_tag
Note that now, you'll need to manually import any.js or.scss/.css files you need into the corresponding folder. For example, if you create a variables/_colors.scss file, you would then need to import it into your site.scss file:
//in app/javascript/scss/site.scss
@import “variables/colors”;
The logic is now pretty much the same as with Sprockets. Last but not least. If you are archiving your view layout file. You will see:
<!-- app/views/layouts/application.html.erb -->
<%= stylesheet_link_tag 'application', media: 'all' %>
<%= javascript_pack_tag 'application' %>
There is a pack for javascript and a stylesheet for scss.
What!? But why then all assets are required in a single file in app/packs/application.js?
If you archive your config/webpacker.yml file, you'll see that extract_css is false for the development environment but true for the production environment. If you go on and try to remove the stylesheet_link_tag helper and restart your server, you'll see that your scss resources are still loading normally. On the other hand, if you change extract_css to false and restart your server, you won't have any style left. How do I fix it?
<!-- app/views/layouts/application.html.erb -->
<?DOCTYPE html>
<html>
<tête>
<%= stylesheet_pack_tag 'application', media: 'all' %>
<%= javascript_pack_tag 'application' %>
</head>[...]
Simply change the stylesheet_link_tag helper to the stylesheet_pack_tag helper. Then you'll see that your style is back. When extract_css is true, Rails extracts all the style files (.css, .scss, etc.) into a separate file using the mini-css-extract plugin. So what's the point in having a different configuration between environments? Wait for Bobby. That is the next section.
Webpacker hot reload module

Rails 6 and Webpacker now provide a ready-to-use hot reload module. This means that whenever you persist with a change in a javascript stylesheet file in your application, the page will reload in your browser.
Awesome isn't it? It will save you a lot of cmd+R. 🎉
How do you set this up? Easy, just go to your terminal, open a new tab in your project directory and run the following command: $ bin/webpack-dev-server
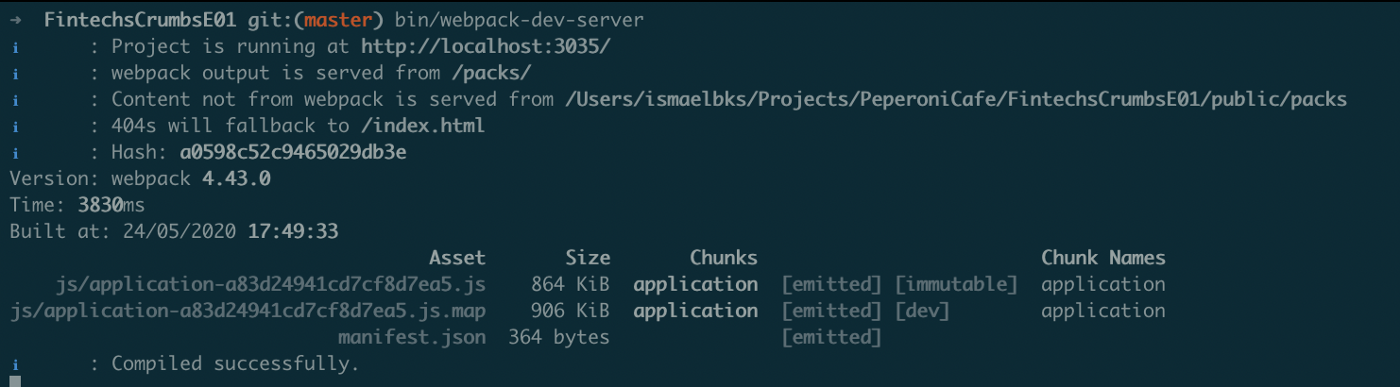
Now, if you go to your site.scss file for example and make changes, you'll see that your browser reloads automatically. ✔ Want more? This article by Alessandro Rodi explains how to set up HMR (Hot Module Reloading). It is important to avoid reloading an entire page when working on a very large project. When properly configured, you can only recompile the affected style sheets, which will significantly speed up the page reloading.
Bootstrap added
Now back on track. Let's add Bootstrap via Yarn:
$ thread add bootstrap
=> thread add v1.22.4
=> [1/4] 🔍 Package resolution...
=> [2/4] 🚚 Retrieving packages...
=> [3/4] 🔗 Linking dependencies...
=> [4/4] 🔨 Building new packages...
=> success Lock file saved.
=> success Registered 1 new dependency.
=> info Direct dependencies
=> bootstrap @4 .5.0
=> info All dependencies
=> bootstrap @4 .5.0
=> ✨ Done in 4.03s.
Now we need to require both its js and scss files. Go to our app/javascript/ folder.
First the js file:
//in app/javascript/js/
import 'bootstrap'... and the scss file:
//in app/javascript/scss/
@import “~bootstrap/scss/bootstrap.scss”;
At this point, your HMR should have reloaded your page twice (one for each file). The second time, you may have noticed that your application's default font has changed to System-ui (the default font in Bootstrap 4). That means Bootstrap is ready to go.
If you don't like the javascript folder...
Webpacker sets the source_path location for assets to app/javascript by default. Maybe I'm old school, but seeing a javascript folder (without “s”) makes me cranky.
I like to rename it webpacker:
# in config/webpacker.yml
default: &default
source_path: app/webpacker # instead of “app/javascript”
source_entry_path: packs
public_root_path: public
public_output_path: packs
cache_path: tmp/cache/webpacker
Don't forget to restart your webpack-dev-server afterwards.
And that's it! 👌
PS: Thanks to Kernael who helped me with the plugin supply part.